Prepare
How to prepare resource for pigsty deployment?
Node provisioning
Before deploying Pigsty, users need to prepare machine node resources, including at least one meta node, with any number of database nodes.
[database nodes](… /… /concept/arch/#database nodes) can use any SSH reachable nodes: physical machines, virtual machines, containers, etc., but currently Pigsty only supports CentOS 7 operating system.
Pigsty recommends using physical and virtual machines for deployment. When using a local sandbox environment, Pigsty is based on Vagrant and Virtualbox to quickly pull up local VM resources, please refer to Vagrant tutorial for more details.
Pigsty requires [meta-node](. /… /concept/arch/# meta-node) as the control center for the entire environment and to provide [infrastructure](. /… /concept/arch/#infrastructure) services. The number of meta-nodes requires a minimum of 1, recommends 3, and suggests no more than 5. If deploying DCS to a meta-node, it is recommended that 3 meta-nodes be used in a production environment to fully ensure the availability of DCS services.
Users should ensure that they can login to the metanode and can [passwordless SSH login](users/#configure SSH passwordless access) other nodes from the metanode and [passwordless](users#configure passwordless SUDO) execute the sudo command.
Users should ensure that they have direct or indirect access to port 80 of the meta node to access the user interface provided by Pigsty.
Software Placement
The user should [download this project](software/# download pigsty source code) and [offline package](software/# download offline package) on the metanode (optional).
When pulling up Pigsty using the local sandbox, the user will also need to additionally install on the host.
1 - Vagrant
How to install, config, use vagrant
Often, in order to test a system such as a “database cluster”, users need to prepare several virtual machines in advance. Although cloud services are already very convenient, local virtual machine access is usually easier, more responsive and less expensive than cloud virtual machine access. Local VM configuration is relatively cumbersome, and Vagrant can solve this problem.
Pigsty users don’t need to understand how vagrant works, they just need to know that vagrant can simply and quickly pull up several virtual machines on a laptop, PC or Mac according to the user’s needs. All the user needs to accomplish is to express their virtual machine requirements in the form of a vagrant configuration file.
Vagrant Installation
Visit official website
https://www.vagrantup.com/downloads

Download Vagrant
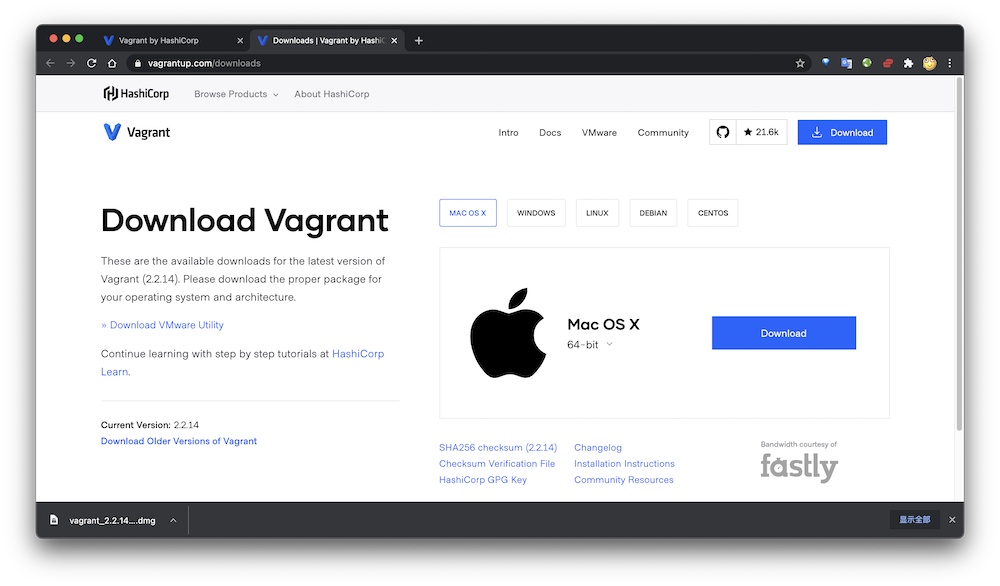
最新版本为2.2.14
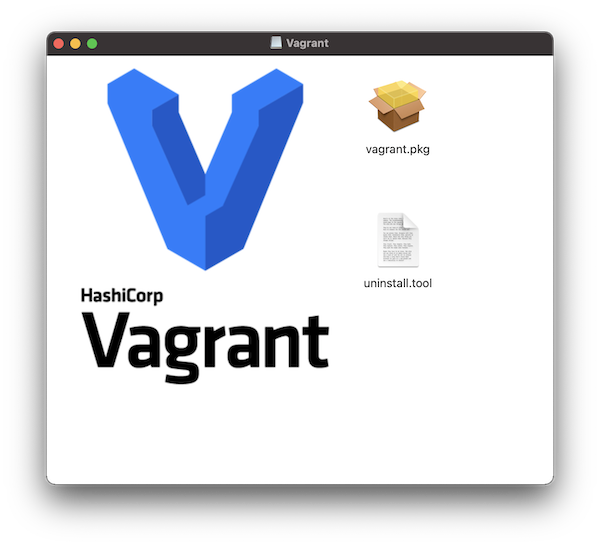
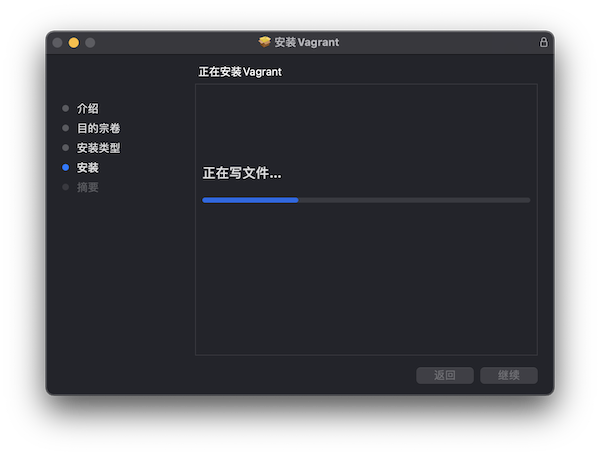
Vagrant Install
点击 vagrant.pkg 执行安装,安装过程需要输入密码。https://www.virtualbox.org/
Vagrantfile
�https://github.com/Vonng/pigsty/blob/master/vagrant/Vagrantfile 提供了一个Vagrantfile样例。
这是Pigsty沙箱所使用的Vagrantfile,定义了四台虚拟机,包括一台2核/4GB的中控机/元节点,和3台 1核/1GB 的数据库节点。
vagrant 二进制程序根据 Vagrantfile 中的定义,默认调用 Virtualbox 完成本地虚拟机的创建工作。
进入Pigsty根目录下的vagrant目录,执行vagrant up,即可拉起所有的四台虚拟机。
IMAGE_NAME = "centos/7"
N=3  # 数据库机器节点数量,可修改为0

Vagrant.configure("2") do |config|
    config.vm.box = IMAGE_NAME
    config.vm.box_check_update = false
    config.ssh.insert_key = false

    # 元节点
    config.vm.define "meta", primary: true do |meta|  # 元节点默认的ssh别名为`meta`
        meta.vm.hostname = "meta"
        meta.vm.network "private_network", ip: "10.10.10.10"
        meta.vm.provider "virtualbox" do |v|
            v.linked_clone = true
            v.customize [
                    "modifyvm", :id,
                    "--memory", 4096, "--cpus", "2",   # 元节点的内存与CPU核数:默认为2核/4GB
                    "--nictype1", "virtio", "--nictype2", "virtio",
                    "--hwv·irtex", "on", "--ioapic", "on", "--rtcuseutc", "on", "--vtxvpid", "on", "--largepages", "on"
                ]
        end
        meta.vm.provision "shell", path: "provision.sh"
    end

    # 初始化N个数据库节点
    (1..N).each do |i|
        config.vm.define "node-#{i}" do |node|  # 数据库节点默认的ssh别名分别为`node-{1,2,3}`
            node.vm.box = IMAGE_NAME
            node.vm.network "private_network", ip: "10.10.10.#{i + 10}"
            node.vm.hostname = "node-#{i}"
            node.vm.provider "virtualbox" do |v|
                v.linked_clone = true
                v.customize [
                        "modifyvm", :id,
                        "--memory", 2048, "--cpus", "1", # 数据库节点的内存与CPU核数:默认为1核/2GB
                        "--nictype1", "virtio", "--nictype2", "virtio",
                        "--hwvirtex", "on", "--ioapic", "on", "--rtcuseutc", "on", "--vtxvpid", "on", "--largepages", "on"
                    ]
            end
            node.vm.provision "shell", path: "provision.sh"
        end
    end
end
定制Vagrantfile
如果用户的机器配置不足,则可以考虑使用更小的N值,减少数据库节点的数量。如果只希望运行单个元节点,将其修改为0即可。
用户还可以修改每台机器的CPU核数和内存资源等,如配置文件中的注释所述,详情参阅Vagrant与Pigsty文档。
沙箱环境默认使用IMAGE_NAME = "centos/7",首次执行时会从vagrant官方下载centos 7.8 virtualbox 镜像,确保宿主机拥有合适的网络访问权限(科学上网)!
快捷方式
Pigsty已经提供了对常用vagrant命令的包装,用户可以在项目的Makefile中看到虚拟机管理的相关命令:
make        # 启动集群
make new    # 销毁并创建新集群
make dns    # 将Pigsty域名记录写入本机/etc/hosts (需要sudo权限)
make ssh    # 将虚拟机SSH配置信息写入 ~/.ssh/config
make clean	# 销毁现有本地集群
make cache	# 制作离线安装包,并拷贝至宿主机本地,加速后续集群创建
make upload # 将离线安装缓存包 pkg.tgz 上传并解压至默认目录 /www/pigsty
更多信息,请参考Makefile
###############################################################
# vm management
###############################################################
clean:
	cd vagrant && vagrant destroy -f --parallel; exit 0
up:
	cd vagrant && vagrant up
halt:
	cd vagrant && vagrant halt
down: halt
status:
	cd vagrant && vagrant status
suspend:
	cd vagrant && vagrant suspend
resume:
	cd vagrant && vagrant resume
provision:
	cd vagrant && vagrant provision
# sync ntp time
sync:
	echo meta node-1 node-2 node-3 | xargs -n1 -P4 -I{} ssh {} 'sudo ntpdate pool.ntp.org'; true
	# echo meta node-1 node-2 node-3 | xargs -n1 -P4 -I{} ssh {} 'sudo chronyc -a makestep'; true
# show vagrant cluster status
st: status
start: up ssh sync
stop: halt

# only init partial of cluster
meta-up:
	cd vagrant && vagrant up meta
node-up:
	cd vagrant && vagrant up node-1 node-2 node-3
node-new:
	cd vagrant && vagrant destroy -f node-1 node-2 node-3
	cd vagrant && vagrant up node-1 node-2 node-3
2 - Virtualbox
How to install Virtualbox
It’s quite simple installing virtualbox on MacOS. And similar on other operating systems.
前往Virtualbox官网
https://www.virtualbox.org/

下载Virtualbox
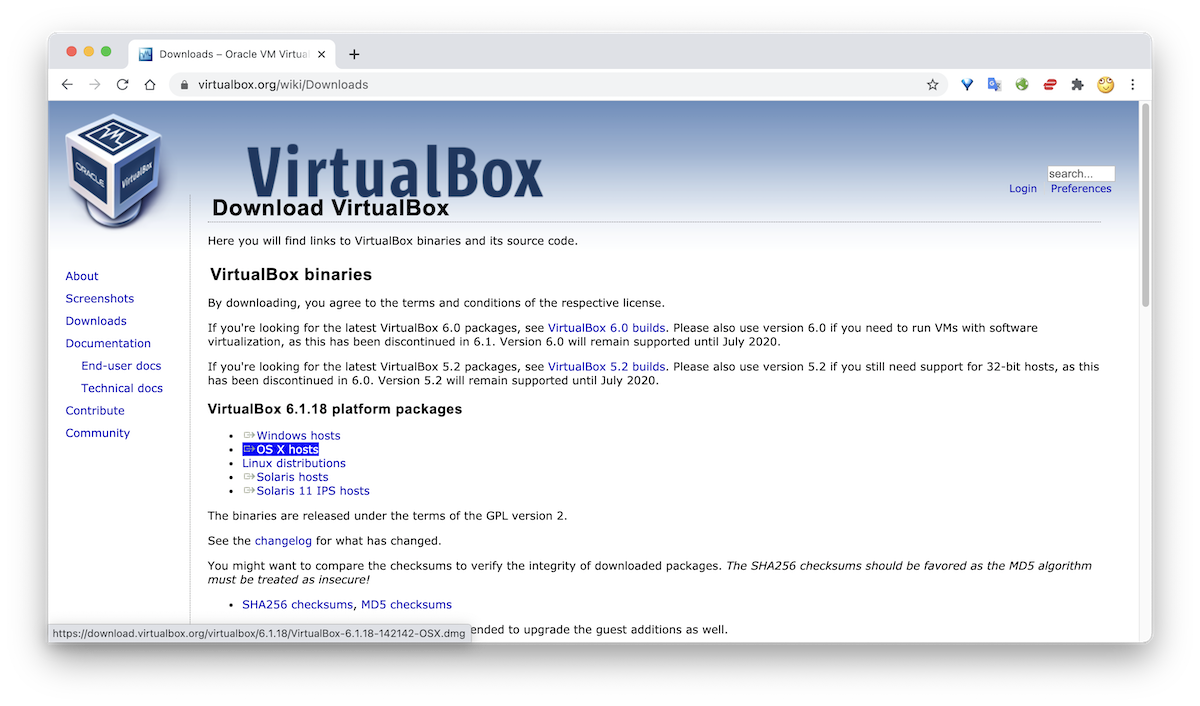
最新版本为6.1.18
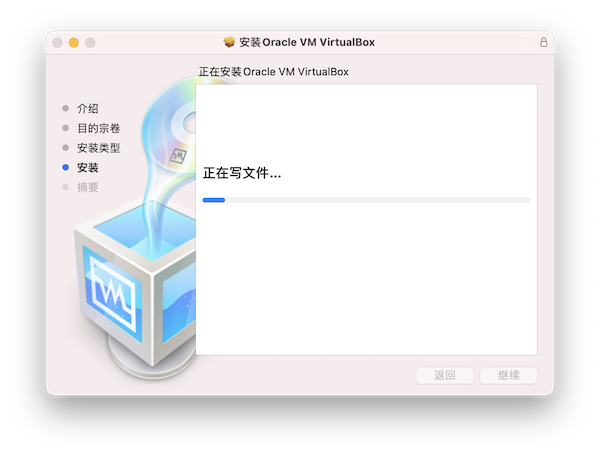
安装Virtualbox
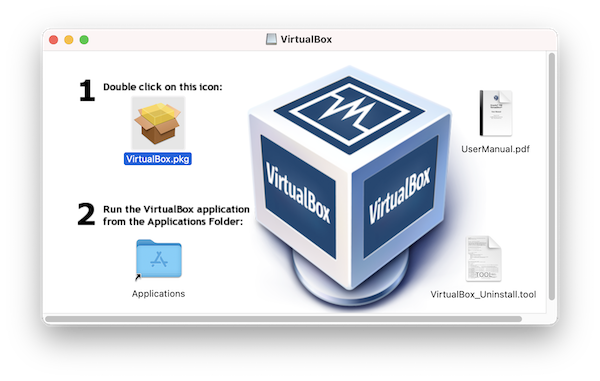
点击 VirtualBox.pkg 执行安装,安装过程需要输入密码并重启。
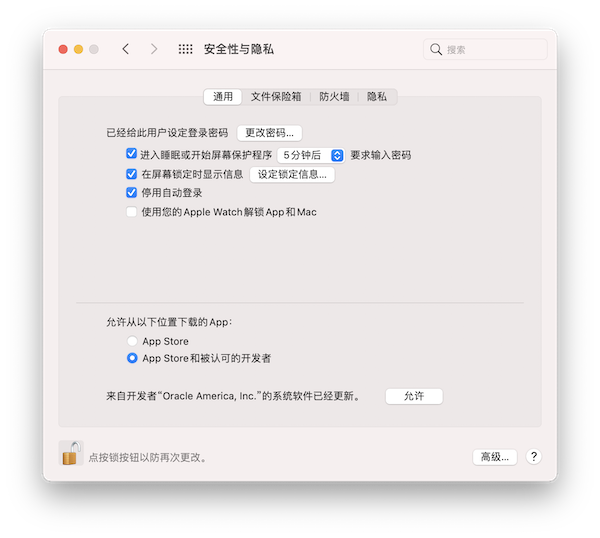
如果安装失败,请检查您的 系统偏好设置 - 安全性与隐私 - 通用 - 允许以下位置的App中点击“允许”按钮。
就这?
没错,您已经成功安装完Oracle Virtualbox了!
3 - Ansible
How to install vagrant
Ansible is a popular and simple automated IT tool that is widely used for operations management and software deployment.
Ansible is the execution vehicle for Pigsty scripts, so if you don’t need to customize this project, users don’t need to know much about Ansible details, just think of it as an advanced Shell or Python interpreter.
How to install
Ansible can be installed via the package manager
brew install ansible # macos
yum  install ansible # linux
Check installed version
$ echo $(ansible --version)
ansible 2.10.3
Ansible 2.9+ is recommended.
How to use
Pigsty项目根目录下提供了一系列Ansible剧本,在其开头的Hashbang中调用ansible-playbook来执行自己。
#!/usr/bin/env ansible-playbook
因此,您通常不需要关心Ansible如何使用,安装完成后,直接使用下面的方式执行Ansible剧本即可。
离线安装Ansible
Pigsty依赖Ansible进行环境初始化。但如果元节点本身没有安装Ansible,也没有互联网访问怎么办?
离线安装包中本身带有 Ansible,可以直接通过本地文件Yum源的方式使用,假设用户已经将离线安装包解压至默认位置:/www/pigsty。
那么将以下Repo文件写入/etc/yum.repos.d/pigsty-local.repo 中,就可以直接使用该源。
[pigsty-local]
name=Local Yum Repo pigsty
baseurl=file:///www/pigsty
skip_if_unavailable = 1
enabled = 1
priority = 1
gpgcheck = 0
执行以下命令,在元节点上离线安装Ansible :
yum clean all
yum makecache
yum install ansible
4 - Admin User
How to config ssh nopass and nopass sudo?
Pigsty requires an administrative user that can SSH password-free to other nodes from the meta-node and execute the sudo command password-free.
Admin user
Pigsty recommends that the creation of the administrative user, privilege configuration and key distribution be done during the Provisioning phase of the VM as part of the delivered content.
The default user for sandbox environments, vagrant, is already configured with password-free login and password-free sudo by default, and you can use vagrant to login to all database nodes from the host or sandbox meta-node. For production environments, i.e. when the machine is delivered, there should already be such a user configured with unencrypted remote SSH login and unencrypted sudo.
If not, the user will need to create it himself. If the user has root privileges, they can also perform the initialization directly with root identity, and Pigsty can complete the creation of the administrative user during the initialization process. The relevant configuration parameters include.
Whether to create an admin user on each node (password-free sudo with ssh), which will be created by default.
Pigsty by default creates an admin user named admin (uid=88) that can SSH-free access to other nodes in the environment from the meta-node and perform password-free sudo.
The uid of the administrator user, default is 88
Name of the admin user, default is admin
Does the SSH key for the admin user get exchanged between the machines currently executing the command?
The exchange is performed by default, so that the administrator can quickly jump between machines.
Key written to admin ~/.ssh/authorized_keys
Users with the corresponding private keys can log in as administrators.
By default, Pigsty will create the administrator user admin with uid=88 and exchange that user’s key cluster-wide.
node_admin_pks given in the public key will be installed to the authorized_keys of the admin account, and the user with the corresponding private key can directly log in remotely without encryption.
On the meta node, assume the username of the user executing the command is vagrant.
Generate the key
Execute the following command as user vagrant to generate a public-private key pair for vagrant to use for login.
- Default public key:
~/.ssh/id_rsa.pub
- Default private key:
~/.ssh/id_rsa
Install the key
Add the public key to the corresponding user on the machine you need to log in to: /home/vagrant/.ssh/authorized_keys
If you already have direct password access to the remote machine, you can copy the public key directly via ssh-copy-id.
# Enter the password to complete the public key copy
ssh-copy-id <ip>
# Embed the password directly into the command to avoid interactive password entry
sshpass -p <password> ssh-copy-id <ip>
Then you can log in to the remote machine via password-free SSH for that user.
Assuming the username is vagrant, add the following entry via the visudo command, or by creating the /etc/sudoers.d/vagrant file.
%vagrant ALL=(ALL) NOPASSWD: ALL
Then the vagrant user can execute all commands without sudo
5 - Prepare Software
How to prepare software resource for pigsty deployment
Users need to download the Pigsty project to the meta-node (in a sandbox environment, you can also use the host to initiate control)
Download Pigsty source code
Users can clone the project directly from Github using git, or download the latest version of the Pigsty source package from the Github Release page at.
git clone https://github.com/Vonng/pigsty
git clone git@github.com:Vonng/pigsty.git
You can also download the latest version of Pigsty from the Pigsty CDN: pigsty.tar.gz
http://pigsty-1304147732.cos.accelerate.myqcloud.com/latest/pigsty.tar.gz
Download the offline installer
Pigsty comes with a sandbox environment, and the offline installer for the sandbox environment is placed in the files directory by default, which can be downloaded from [Github Release](https://github. com/Vonng/pigsty/releases) page.
cd <pigsty>/files/
wget https://github.com/Vonng/pigsty/releases/download/v0.6.0/pkg.tgz
Pigsty’s official CDN also provides the latest version of pkg.tgz for download, just execute the following command.
make downlaod
curl http://pigsty-1304147732.cos.accelerate.myqcloud.com/pkg.tgz -o files/pkg.tgz
For details on how to use the offline installation package, please refer to the [offline installation](. /offline/) section.
Monitor-only mode resources
If you want to use a monitoring-only deployment, it is usually recommended to deploy the monitoring agent using a copy of the monitoring component binary, so you need to download and place the Linux Binary in the files directory beforehand.
files
   ^---- pg_exporter (linux amd64 binary)
   ^---- node_exporter (linux amd64 binary)
The self-contained script files/download-exporter.sh will automatically download the latest versions of node_exporter and pg_exporter from the Internet.
6 - Offline Installation
How to perform offline installation
Pigsty is a complex software system. To ensure the stability of the system, Pigsty downloads all dependent packages from the Internet during the initialization process and creates local repository (local Yum source).
The total size of all dependent software is about 1GB, and the download speed depends on the user’s network. Although Pigsty has tried to use mirror sources as much as possible to speed up the download, the download of a small number of packages may still be blocked by firewalls and may appear very slow. The user can download the packages via proxy_env configuration entry to set up a download proxy to complete the first download.
If you are using a different operating system than CentOS 7.8, it is usually recommended that users use the full online download and installation process. and cache the downloaded software after the first initialization is complete, see [Making an offline installer](#Making an offline installer).
If you wish to skip the long download process, or if the execution control meta-node does not have Internet access, consider downloading a pre-packaged offline installer.
Contents of the offline installer package
To quickly pull up Pigsty, it is recommended to use the offline download package and upload method to complete the installation.
The offline installer includes all packages from the local Yum repository. By default, Pigsty is installed at [infrastructure initialization](. /../playbook/infra/) when the local Yum repository is created.
{{ repo_home }}
  |---- {{ repo_name }}.repo
  ^---- {{ repo_name}}/repo_complete
  ^---- {{ repo_name}}/**************.rpm
By default, {{ repo_home }} is the root directory of the Nginx static file server, which defaults to /www, and repo_name is a custom local source name, which defaults to pigsty.
By default, the /www/pigsty directory contains all RPM packages, and the offline installer is actually a zip archive of the /www/pigsty directory.
The principle of the offline installation package is that Pigsty checks if the local Yum source-related files already exist during the execution of the infrastructure initialization. If they already exist, the process of downloading the package and its dependencies is skipped.
The token file used for the check is {{ repo_home }}/{{ repo_name }}/repo_complete, by default /www/pigsty/repo_complete, if this token file exists, (usually set by Pigsty after the local source is created), then the local source has been created and can be used directly. Otherwise, Pigsty will perform the usual download logic. Once the download is complete, you can archive a compressed copy of the directory for accelerating the initialization of other environments.
沙箱环境
下载离线安装包
Pigsty自带了一个沙箱环境,沙箱环境的离线安装包默认放置于files目录中,可以从Github Release页面下载。
cd <pigsty>/files/
wget https://github.com/Vonng/pigsty/releases/download/v0.6.0/pkg.tgz
Pigsty的官方CDN也提供最新版本的pkg.tgz下载,只需要执行以下命令即可。
make downlaod
curl http://pigsty-1304147732.cos.accelerate.myqcloud.com/pkg.tgz -o files/pkg.tgz
上传离线安装包
使用Pigsty沙箱时,下载离线安装至本地files目录后,则可以直接使用 Makefile 提供的快捷指令make upload上传离线安装包至元节点上。
使用 make upload,也会将本地的离线安装包(Yum缓存)拷贝至元节点上。
# upload rpm cache to meta controller
upload:
	ssh -t meta "sudo rm -rf /tmp/pkg.tgz"
	scp -r files/pkg.tgz meta:/tmp/pkg.tgz
	ssh -t meta "sudo mkdir -p /www/pigsty/; sudo rm -rf /www/pigsty/*; sudo tar -xf /tmp/pkg.tgz --strip-component=1 -C /www/pigsty/"
制作离线安装包
使用 Pigsty 沙箱时,可以通过 make cache 将沙箱中元节点的缓存制为离线安装包,并拷贝到本地。
# cache rpm packages from meta controller
cache:
	rm -rf pkg/* && mkdir -p pkg;
	ssh -t meta "sudo tar -zcf /tmp/pkg.tgz -C /www pigsty; sudo chmod a+r /tmp/pkg.tgz"
	scp -r meta:/tmp/pkg.tgz files/pkg.tgz
	ssh -t meta "sudo rm -rf /tmp/pkg.tgz"
在生产环境离线安装包
在生产环境使用离线安装包前,您必须确保生产环境的操作系统与制作该离线安装包的机器操作系统一致。Pigsty提供的离线安装包默认使用CentOS 7.8。
使用不同操作系统版本的离线安装包可能会出错,也可能不会,我们强烈建议不要这么做。
如果需要在其他版本的操作系统(例如CentOS7.3,7.7等)上运行Pigsty,建议用户在安装有同版本操作系统的沙箱中完整执行一遍初始化流程,不使用离线安装包,而是直接从上游源下载的方式进行初始化。对于没有网络访问的生产环境元节点而言,制作离线软件包是至关重要的。
常规初始化完成后,用户可以通过make cache或手工执行相关命令,将特定操作系统的软件缓存打为离线安装包。供生产环境使用。
从初始化完成的本地元节点构建离线安装包:
tar -zcf /tmp/pkg.tgz -C /www pigsty # 制作离线软件包
在生产环境使用离线安装包与沙箱环境类似,用户需要将pkg.tgz复制到元节点上,然后将离线安装包解压至目标地址。
这里以默认的 /www/pigsty 为例,将压缩包中的所有内容(RPM包,repo_complete标记文件,repodata 源的元数据库等)解压至目标目录/www/pigsty中,可以使用以下命令。
mkdir -p /www/pigsty/
sudo rm -rf /www/pigsty/*
sudo tar -xf /tmp/pkg.tgz --strip-component=1 -C /www/pigsty/