Quick Start
This tutorial will describe how to pull up a Pigsty demo sandbox on your laptop based on vagrant.
If you already have some nodes that can be used for deployment, refer to deployment-guide for more detail.
TL; DR
If you already have vagrant, virtualbox and ansible, then simply clone and enter the project and then execute the following commands in order.
make up          # pull-up 4 vm nodes
make ssh         # config vm ssh nopass access
sudo make dns    # write pigsty static DNS (sudo required)
make init        # init pigsty
make mon-view    # open pigsty home page
Standard command output: Reference - Procedure
Specification
The standard Pigsty demo sandbox contains four virtual machine nodes, one of which is a meta-node, with three database nodes. Provisioning is done through Vagrant.
The meta-node is used to manage the entire system, with infrastructure components deployed: including DNS, NTP, DCS, monitoring system components, etc., and therefore usually requires a higher configuration.
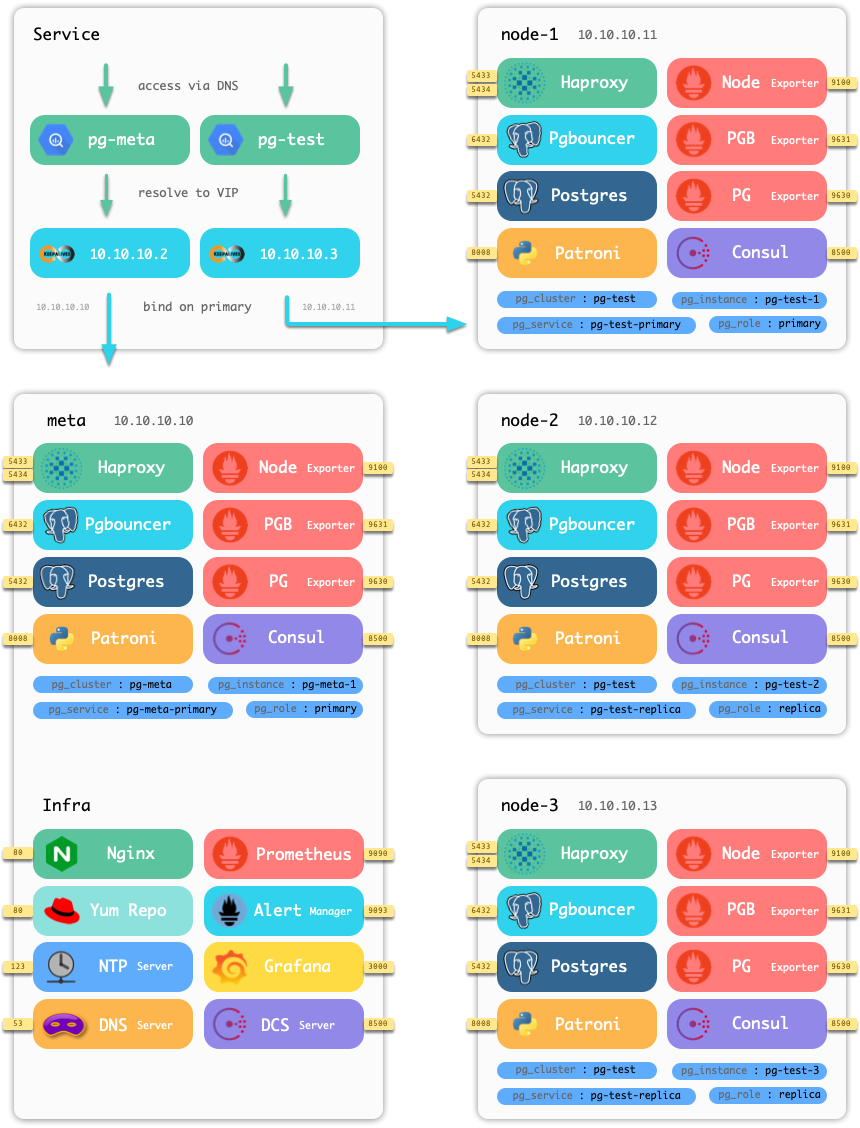
The meta node defaults to 2 cores/4GB and the database node defaults to 1 core/2GB, so the host should have at least a 5 core/10GB configuration by default.
If your machine is under-configured, consider reducing the number of nodes, or lowering the resource requirements of the nodes. The minimum configuration contains only a single meta-node with a resource requirement of 1core/1GB.
Minimum
- Self-contained single node, singleton database pg-meta
- Minimal requirement: 2 CPU Core & 2 GB RAM
Standard
- 4 Node, including single meta node, singleton databaes cluster pg-meta and 3-instances database cluster pg-test
- Recommend Spec: 2Core/2GB for meta controller node, 1Core/1GB for database node
Installation
Prepare
Before running pigsty sandbox, you will have to install vagrant and virtualbox first. If you wish to run control from host (rather than meta node inside vm). ansible installation is also needed.

You can install ansible via package managers:
brew install ansible # macos
yum  install ansible # linux
Check installed version:
$ echo $(vagrant --version)
Vagrant 2.2.13

$ echo $(vbox-img --version)
6.1.16r140961

$ echo $(ansible --version)
ansible 2.10.3
Clone Repo
Clone this repo and enter it (take /tmp/pigsty as example)
cd /tmp && git clone https://github.com/Vonng/pigsty && cd pigsty
Launch VM
make up will invokevagrant up, and create four vm based on Vagrantfile.
Refer to Vagrant Provision for more detail
$ make up
cd vagrant && vagrant up
Bringing machine 'meta' up with 'virtualbox' provider...
Bringing machine 'node-1' up with 'virtualbox' provider...
Bringing machine 'node-2' up with 'virtualbox' provider...
Bringing machine 'node-3' up with 'virtualbox' provider...
==> meta: Cloning VM...
==> meta: Matching MAC address for NAT networking...
==> meta: Setting the name of the VM: vagrant_meta_1609817410777_92884
==> meta: Clearing any previously set network interfaces...
==> meta: Preparing network interfaces based on configuration...
    meta: Adapter 1: nat
    meta: Adapter 2: hostonly
==> meta: Forwarding ports...
    meta: 22 (guest) => 2222 (host) (adapter 1)
==> meta: Running 'pre-boot' VM customizations...
==> meta: Booting VM...
==> meta: Waiting for machine to boot. This may take a few minutes...
    meta: SSH address: 127.0.0.1:2222
......
==> node-3: Running provisioner: shell...
    node-3: Running: /var/folders/_5/_0mbf4292pl9y4xgy0kn2r1h0000gn/T/vagrant-shell20210105-17045-1rj8hxd.sh
    node-3: [INFO] write ssh config to /home/vagrant/.ssh
Config SSH
Default vm user is vagrant
make ssh will invoke vagrant ssh-config. and write pigsty vm ssh credentials to ~/.ssh/pigsty_config.
This command is only needed for the first time.
$ make ssh
cd vagrant && vagrant ssh-config > ~/.ssh/pigsty_config 2>/dev/null; true
if ! grep --quiet "pigsty_config" ~/.ssh/config ; then (echo 'Include ~/.ssh/pigsty_config' && cat ~/.ssh/config) >  ~/.ssh/config.tmp; mv ~/.ssh/config.tmp ~/.ssh/config && chmod 0600 ~/.ssh/config; fi
if ! grep --quiet "StrictHostKeyChecking=no" ~/.ssh/config ; then (echo 'StrictHostKeyChecking=no' && cat ~/.ssh/config) >  ~/.ssh/config.tmp; mv ~/.ssh/config.tmp ~/.ssh/config && chmod 0600 ~/.ssh/config; fi
Config DNS
Some web UI system require domain names to distinguish them.
You can chagne /etc/hosts static DNS records to achieve that.
make dns will write pigsty static DNS records to /etc/hosts,
so that you can access internal web pages via your browser.
Note that make dns require sudo privileges.
$ sudo make dns
Password:
if ! grep --quiet "pigsty dns records" /etc/hosts ; then cat files/dns >> /etc/hosts; fi
This command is only needed for the first time.
# pigsty dns records

10.10.10.2   pg-meta                      # sandbox vip for pg-meta
10.10.10.3   pg-test                      # sandbox vip for pg-test
10.10.10.10  meta-1                       # sandbox node meta-1 (node-0)
10.10.10.11  node-1                       # sandbox node node-1
10.10.10.12  node-2                       # sandbox node node-2
10.10.10.13  node-3                       # sandbox node node-3

10.10.10.10 pigsty y.pigsty yum.pigsty
10.10.10.10 c.pigsty consul.pigsty
10.10.10.10 g.pigsty grafana.pigsty
10.10.10.10 p.pigsty prometheus.pigsty
10.10.10.10 a.pigsty alertmanager.pigsty
10.10.10.10 n.pigsty ntp.pigsty
10.10.10.10 h.pigsty haproxy.pigsty
Offline Installtion Cache (Optional)
Pigsty is a complex software system. To ensure system stability, Pigsty will download all dependent packages from the Internet and create local Yum sources during the initialization process.
The total size of all dependent software is about 1GB, and the download speed depends on your network. Although Pigsty has tried to use mirrored sources to speed up the download, a small number of packages may still be blocked by firewalls and may appear very slow. You can set a download proxy to complete the first download with the proxy_env configuration item, or download a pre-packaged offline installer directly. For example, the latest offline installer is available at
https://github.com/Vonng/pigsty/releases/download/v0.5.0/pkg.tgz
Copy that file to files/pkg.tgz. make upload will scp it to meta node.
In order to pull up Pigsty quickly , it is recommended to use offline installation if applicable.
The default offline package is based on CentOS 7.8. For production environments, we strongly recommend that you complete a full network download and cache your own offline package via make cache.
Bootstrap
make init will invoke ansible to perform pigsty bootstrap
$ make init
./sandbox.yml # provision sandbox
If you have uploaded the offline installer to the metanode, then initializing the environment will be relatively fast and may take anywhere from 5 to 10 minutes in total depending on the machine configuration.
If the offline installer does not exist, then Pigsty will download about 1GB of data from the Internet during the initialization process, which may take 20 minutes or more depending on network conditions.
It is strongly recommended that you execute the make cache command after the first initialization. This command will make an offline cache of the downloaded software and place it in files/pkg.tgz. This way, when you create a new pigsty environment next time, you can reuse the offline package as long as the operating system in the host is the same, saving a lot of download time.
Explore Monitoring System
After bootstrap, you can access http://pigsty via your browser.
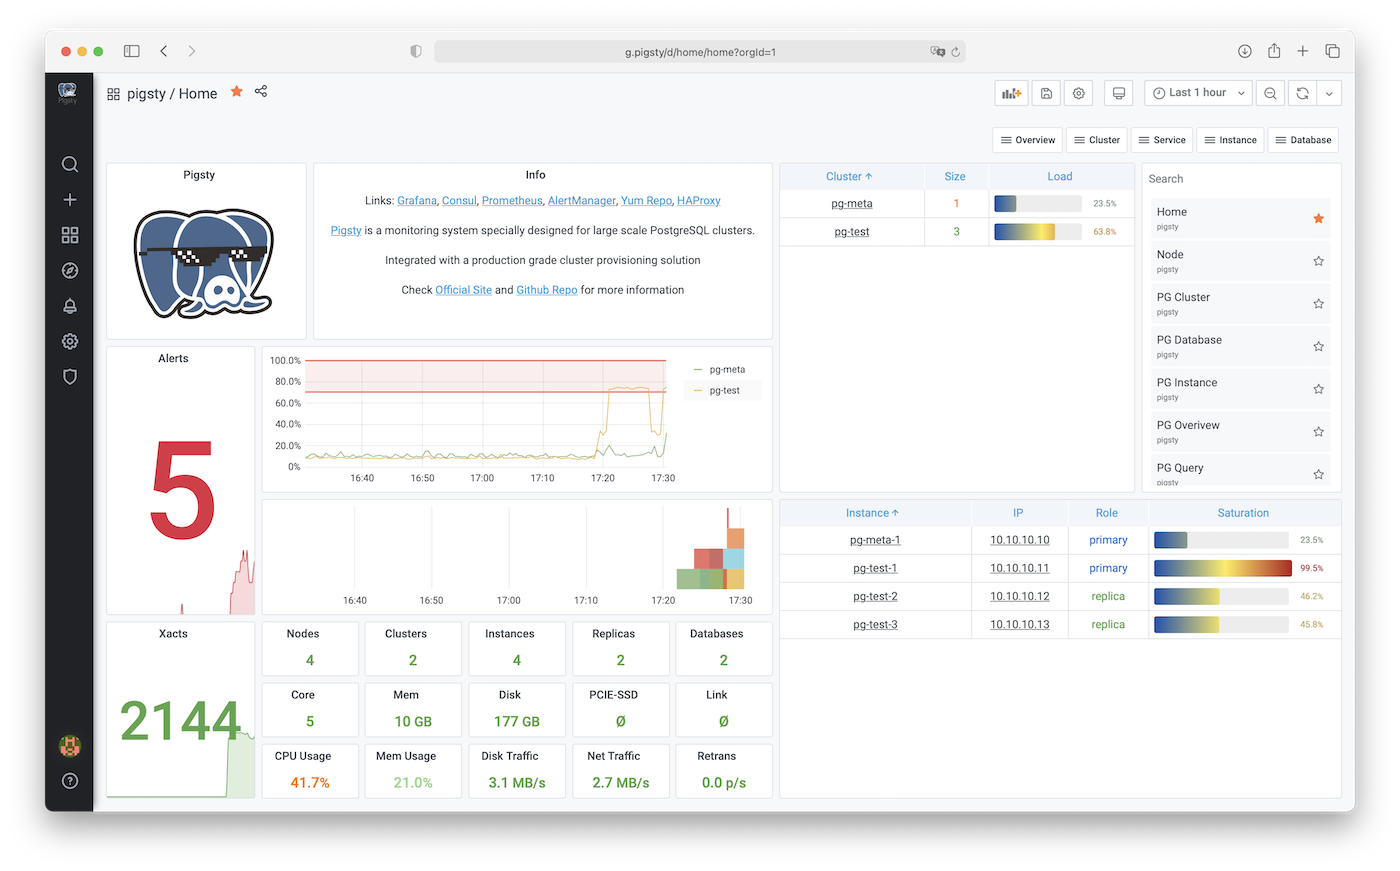
- http://pigsty : default home page and yum repo (80)
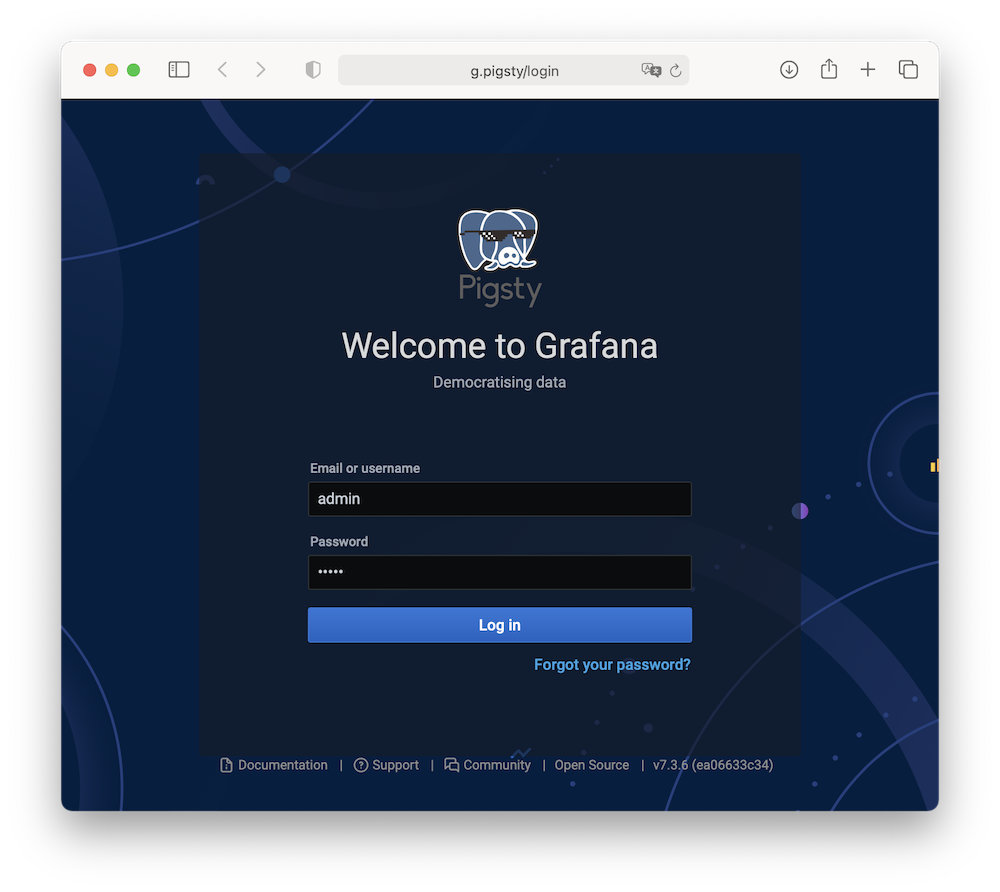
- http://g.pigsty : default monitoring system entrance (credential: admin/admin) (3000)
- http://p.pigsty : prometheus web UI (9090)
- http://a.pigsty : alertmanager web UI (9093)
- http://c.pigsty : consul web UI (8500)
You can also access them directly with IP and port if DNS is not applicable.
Use make mon-view shortcut to enter pigsty monitoring system:
What’s Next
- GUI:Learn about pigsty graphic user interface
- Concept:Read basic concepts about pigsty
- Quick Start:Run sandbox on your laptop演示环境。
- Public Demo:Access public pigsty demo环境
- Tutorial:Deploy pigsty in real-world environment